Baking History

A Taste For The Past

Archive for January, 2008

Vienna Rolls (bbd #06)

Posted by bakinghistory on January 31, 2008

vienna-rolls-2.jpg
Three dainty shapes for buttery and crispy Vienna rolls
— 
— 
—- 
——————
BreadBakingDay #6 Eva from Sweet Sins is the host of bread baking day #06, for which she chose “bread shapes” as a theme.
I found three interesting ways to shape Vienna rolls in an old professional bakers’ manual published in London in 1909. I scaled down the recipe given in the book—which originally called for 17 lb of flour—but I left it otherwise unchanged. The rolls bake beautifully crispy on the outside and have a nice layered interior.
——
Clockwise from the bottom in the picture are shown the cannon roll, the horseshoe, and the twin or double roll.
———
Thanks Eva for choosing a great theme and thanks to Zorra for initiating bbd!
—–
——-
From the original recipe by Charles & James Scott
——–
In: “Vienna Bread: Instructions and Recipes”, 1909—UK
—-
Ingredients
1 cup (228 ml) warm water
1 cup (228 ml) whole milk
5-1/2 cups (770 g) bread flour
0.55 oz (15.6 g) fresh yeast (or 1-3/4 tsp (7 g) active dry yeast or 1 package)
1-3/4 tsp (10.6 g) fine sea salt
1/4 cup (50 g) unsalted butter, cold
———
Egg wash (1 yolk mixed with 1 tbsp water)
———
Scald the milk with the salt and set aside to cool to lukewarm. Dissolve the yeast in the warm water (100°F–38°C) and set aside for about 5 minutes, until foamy. Add yeast water to flour and mix, then add the milk. Knead until the dough develops and feels satiny, smooth, and supple. You might need to add a little more water if the dough seems too dry or a little flour if it is too sticky. Let the dough rest for 15 minutes at room temperature, covered, then place it in a lightly buttered covered container and let it rise in the refrigerator overnight.
—–
Take the dough out of the refrigerator and flatten it in a rectangle 1/4-inch (0.5 cm) thick, with a rolling pin, on a lightly floured surface. Do not knead the dough. Dot the surface of the dough with thin slices of cold butter, 100_6311.jpgthen fold into thirds (business letter fold). Roll the dough again and fold in thirds two more times, letting the dough rest a few minutes every time. The same as you would do with croissants dough.
——–
Once the dough is ready, with sharp scissors or a dough scraper cut 1-1/2 oz (45 g) portions of dough and shape the rolls as shown in the following illustrations from the book.
—–
(click on the thumbnails to enlarge)
————-
For the Cannon Rolls
————
canno-roll-1.jpg cannonball2.jpg cannonball3.jpg Flatten a round portion of dough (1-1/2 oz–45 g) to resemble a “8” shape. Roll the rounded sides to enlarge them, then roll each side toward the center. Finally invert the roll so that the center strip is on top.
———
——–
For the Horseshoe
horseshoe1.jpg horseshoe2.jpg horseshe-3.jpg horseshoe-4.jpg 
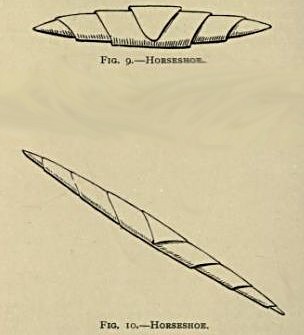
Flatten a portion of dough (1-1/2 oz–45 g) into a round, then roll it into a sharp oval shape. Roll it up starting at one of the narrow ends, then elongate the rolled up dough rolling it under the palms of your hands, making sure the ends are well tapered. Finally curve it into a round, resembling a horseshoe.
—–
——
For the Twin or Double Roll
Simply divide one portion of dough (1-1/2 oz–45 g) into two smaller balls, then join them together.
—————-
————-
Preheat the oven to 400°F (200°C), place the formed rolls on two baking sheets and gently brush them with egg wash. Let the rolls rise, covered, until they are light. Bake them crisp in a dry oven (no steam). Let the rolls cool on a rack.
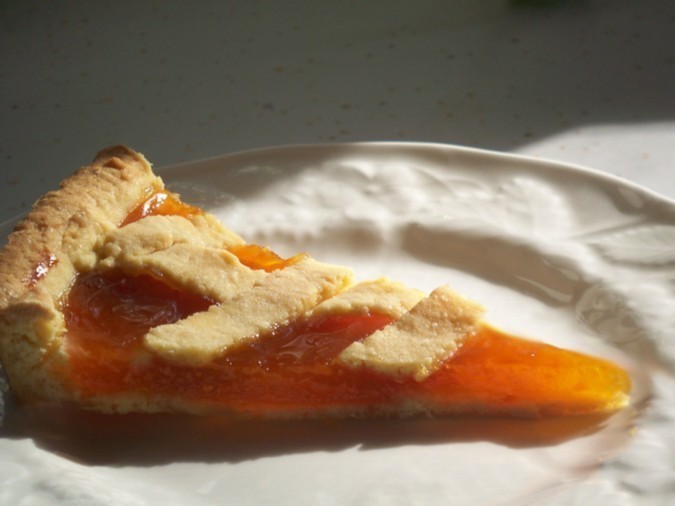
This is how the interior should look; it is important not to knead the dough after the turns vienna-roll-3.jpg (click on the thumbnail to enlarge)
—-
——-
Note: this dough, minus the butter and the turns, can be used, as said in the book, to make Kaiser rolls.

Posted in Blog Events, Rolls, Yeasted Breads | Tagged: , , , , | 18 Comments »

Crostata di Marmellata (Jam Tart)

Posted by bakinghistory on January 23, 2008

crostata-artusi-4.jpg
A traditional Italian jam tart
This is my entry for the event hosted by Erin from Skinny Gourmet, for which participants should post about a food that for them evokes memories and stories. My entry is a jam tart, a dessert rather simple and homey in itself, yet never boring or dull. This is the first kind of baked goods that as a little girl I learned to make from my mother. It was easy and quick to assemble, improved with time, and was our favorite to have with tea. In Italian we called it a crostata di marmellata. It evokes memories of many happy, precious hours spent with my mother in the kitchen, watching her preparing food and learning from her. We always used the following recipe to make pastafrolla—a perfect shortcrust pastry: sweet and buttery but not too rich, tender and crumbly yet sturdy enough to hold the filling.
 –
—-
From the original recipe by Pellegrino Artusi
——–
In: La Scienza in Cucina e l’Arte di Mangiar Bene” , 1891–Italy
——
Ingredients
2 cups (250 g) AP flour, unbleached
——-
1/2 cup (125 g) unsalted butter, diced
——–
1/2 cup (110 g) sugar
——
1 medium egg
——–
1 yolk
——–
1 cup (260 g) fruit jam (such as apricot, plum, or sour cherry)
———
If the granulated sugar is coarse, it is preferable to process it briefly in a food processor or coffee grinder. Mix flour and sugar, then work the butter in with the tip of your fingers until the mixture resembles wet sand. Add the egg and yolk and work briefly until the dough just holds together.
It is important not to overwork the dough (do not knead it) or it will harden when baked.
A food processor works perfectly to make the dough: start by placing flour and sugar in the work bowl, process for a few seconds to mix, then add the butter and pulse a few times until the mixture looks like wet sand. Add the egg and yolk and process a few seconds more until the dough forms. Do not overprocess.
———
Wrap the dough in wax paper and let it rest in a cool place for at least 30 minutes.
—-
On a lightly floured board roll 2/3 of the pastry dough to a 1/8-in (3 mm) thickness, and line with it the bottom and sides of a 9-in (23 cm) tart pan with scalloped edges and a removable bottom. The sides should be lined with a slightly thicker layer of pastry than the bottom, about 1/4-in (0.5 cm). Fold back in the dough that is hanging over the sides to make a thicker lining along the sides. Cut of excess. Prick the pastry bottom with the tines of a fork in a few places, then spread with the jam. Do not use a deep tart mold.
———
Roll the remaining pastry on a lightly floured board slightly thicker than 1/8-in (3 mm), then with a sharp knife or pastry cutter cut it in strips 1/4-inch (0.5 cm) wide and make a lattice on top of the jam layer. There might be some leftover pastry. I usually make a few cookies with it, or tartlets.
——
You can see how the lattice should look here.
———
Preheat the oven to 400°F (200°C) and bake the tart until golden, about 25 minutes. Unmold the tart as soon as it is ready and let it cool on a rack. If left in the pan it will turn irremediably soggy. It is great freshly baked but it definitely improves after a day or two, if kept in a closed container.
——
A note on the fruit jam: select a jam that is relatively low in sugar, 38% to 40% content of sugar is best; jams that contain a higher percentage of sugar tend to be adversely affected by the baking temperatures, turning sticky and ruining the final result.
—-
—-

Posted in Blog Events, Desserts, Fruit, Italian Cuisine, Italy, Pies & Tarts | Tagged: , , , , , , , | 9 Comments »

Boston Cream Pie

Posted by bakinghistory on January 20, 2008

boston-cream-pie-ii.jpg
The official dessert of the Commonwealth of Massachusetts: delicious Boston Cream Pie
———–
———
——— 
taste300.jpg This is my entry for the blog event “A Taste of Terroir” hosted by Anna’s Cool Finds for which entries should highlight a specific food typical of a given area.
I write from beautiful Massachusetts, and there are many wonderful foods that are typical of this area: from chowder to corn muffins, from cranberries to chocolate chips cookies to Parker House rolls.
——
One of my favorites is Boston Cream Pie, which is Massachusetts official dessert—A light sponge cake filled with vanilla cream and then iced with a dark chocolate icing, which provides a nice counterpart to the sweetness of the filling.
——–
The version I propose here is the most known, and was created in 1856 at the famous Parker House Hotel in Boston by French chef M. Sanzian. An earlier version was made without the chocolate icing and simply sprinkled on top with powdered sugar.
As for why it is called a “pie” while it is in fact a cake is not entirely clear, one possible explanation is that pie plates were once more common and easily available and were used to bake cakes as well.
Whether this is the actual reason for the name or not, it is indeed a delightful dessert.
—-
The recipe I used is an antique receipt and gives outstanding results—it is really worth trying.
Of course, if you have a chance, do visit Massachusetts and taste the Boston Cream Pie in its home State.
From the original recipes by Fanny L. Gillette
—————
In: The White House Cook Book” , 1887—USA
———
Ingredients
——
Filling
2 cups (475 ml) whole milk
——-
2 eggs
—–
1 cup (200 g) sugar
——-
1/2 cup (60 g) flour
———
2 tbsp (30 g) butter
———
1 tsp (5 ml) pure vanilla extract or paste
Cake
——
3 eggs, divided
1 cup (200 g) sugar
1-1/2 cups (180 g) sifted flour
1 heaping tsp (6 g) baking powder
—-
2 tbsp (30 ml) milk or water
—–
Plain Chocolate Icing
—–
1 oz (30 g) bittersweet chocolate
3 tbsp (45 ml) milk or cream
1 tbsp (15 ml) water
scant 2/3 cup (120 g) sugar
—-
Make the Cream Filling: Scald the milk and set aside to cool. Mix together the flour and sugar, then beat the eggs and add the flour-sugar mixture, stirring until well incorporated. Add the warm milk in a thin stream, mixing well. Place on medium-low heat and cook stirring continuously, adding the butter as soon as the mixture starts to simmer. Cook the cream, always stirring to prevent scorching, until it thickens–it will offer some resistance to the spoon while you stir. Take the cream off the heat and stir in the vanilla, mixing well.
If any lumps should form, you can either strain the cream once it is ready, or blend it briefly with an immersion blender. Let the cream cool and then refrigerate it in a glass container with an airtight lid.
Make the Cake: Preheat the oven to 350°F (180°C). Grease two 9-inch (23 cm) cake pans, line the bottom with parchment paper, then grease the paper as well.
Sift the flour with the baking powder. Beat the egg whites until stiff and glossy, being careful not to overbeat them. Set aside.
Beat the yolks at high speed for at least 15 minutes, adding the sugar little by little until the mixture is pale yellow and thick. Add the milk or water, then add the flour-baking powder mixture little by little. Finally fold in the egg whites, making sure not to deflate them. Divide the batter between the prepared pans and bake for about 20-25 minuets, until golden. Let the cakes cool in the pans for five minutes, then unmold them and let them finish cooling on racks.
When the cakes are cold, assemble the cake: spread a thick layer of cream on top of one of the cakes, then place the second one on top.
—-
Make the Chocolate Icing: Melt the chocolate on very low heat, then mix in the cream or milk and the water, finally adding the sugar little by little. Place on low heat and mix until the sugar is dissolved. If any sugar granules adhere to the sides of the pan, wash them off with a pastry brush dipped in cold water, or the icing will be grainy. Stir the mixture until it starts to boil, then let it cook, without stirring, for five minutes. Immediately pour the hot chocolate icing on top of the cake, starting form the center and letting the icing fall down the sides. Do not use a spatula to spread the icing or it won’t be glossy. The icing hardens quickly, so you need to be fast pouring it on the cake.
Let the icing set, then place the cake in the refrigerator in a closed container large enough that the lid does not touch the top of the cake. Serve the cake slightly chilled.
——

Posted in American Cooking, Blog Events, Cakes, Regional American Food, State Foods | Tagged: , , , , , , | 14 Comments »

Arroz Con Leche (Rice Pudding)

Posted by bakinghistory on January 17, 2008

arroz-con-leche-ii.jpg
Comfort food: a bowl of creamy arroz con leche, lightly sweetened and flavored with cinnamon and lemon zest
cookoff200.jpg This is my entry for the 2008 edition of the Comfort Food Cook-Off hosted by Eve from The Garden of Eating.
———–
This type of rice and milk pudding is, for me, the ultimate comfort food. The texture is velvety and speckled with pleasantly chewy rice kernels, while the flavor is delicate without being bland or cloyingly sweet. It is also easy and quick to make—perfection is simple.
==============
From the original recipe by Calleja
————-
In: “La Mejor Cocinera”, 19….? –Spain
————–
Ingredients
———-
1 qt (1 l ) whole milk
1 cup (200 g) sugar
—-
1 cup (200 g) short-grain rice
——–
1 cinnamon stick
———–
zest of 1 (organic) lemon
————
ground cinnamon to serve
——-
———
Rinse and drain the rice and set aside.
Place the milk, sugar, cinnamon stick and lemon zest in a large saucepan and bring slowly to the boiling point, add the rice and, on low heat, let it cook in the milk until the
———
kernels are tender and the mixture turns creamy. Stir often to prevent scorching, and keep the heat low. It will take about 20-25 minutes, depending on the rice. If it
———-
thickens too much and the rice is not cooked through yet, add a little hot milk and continue cooking until the mixture reaches the right consistency and the rice is tender.
———
Transfer the pudding into individual serving bowls (discard the cinnamon stick and lemon zest strips) and sprinkle lightly with ground cinnamon.
———–
Serve either warm or chilled.
—-
—-

———

Posted in Blog Events, Comfort Food, Desserts, Puddings, Rice, Spanish Cookery, Spices | Tagged: , , , , , , | 4 Comments »

Ginger Bonbons

Posted by bakinghistory on January 14, 2008

ginger-bonbons-v.jpg
Dainty and delicious bonbons with a ginger filling

Blog-Event XXX: Ingwer This is my entry for the Blog-Event XXX: Ingwer (Ginger).

Here is the ROUNDUP 

From the original recipe by Mrs. Sherwood P. Snyder

In: “The Art of Candy Making Fully Explained” , 1915–USA

Ingredients:

5 cups (1 kg) sugar

1-1/2 cups (355 g) water

1 tbsp (15 ml) white vinegar

1/2 lb (227 g) candied ginger, preferably uncrystallized

Necessary equipment:

candy thermometer

metal spatula/scraper

wooden spoon

cake pan 10 x 15 x 2 inches (25.4 x 38 x 5 cm)

small brush

saucepan

————

Make the fondant:

Put the candy thermometer in a cup of hot water.

Place sugar and water in the saucepan, over high heat and stir with a wooden spoon to dissolve the sugar. Wipe down the sides of the saucepan with the brush dipped in cold water until every granule of sugar is removed, or they will make the fondant grainy.

When the syrup begins to boil, add the vinegar, and place the thermometer in the pan, having previously warmed it.

Do not move the pan and do not stir the syrup while it is boiling.

If scum forms on the surface, wait until it collects in one spot, then remove it with a spoon being careful not to disturb the syrup.

While the syrup is boiling, wipe the cake pan with a paper towel dipped in cold water, and do not dry it.

As soon as the syrup reaches 240°F (115.56°C), lift the pan from the heat, being careful not to shake the syrup. Pour it into the prepared cake pan, by holding the saucepan down close, beginning at one side of the cake pan and drawing the saucepan towards the other side as the syrup is being poured.

Do not scrape the last of the syrup from the saucepan, and do not allow the saucepan to drain too much. The drippings will make the fondant grainy.

Allow the syrup to cool until it feels just slightly warm, not cold, to the back of the hand. Begin to work it with the scraper or spatula lifting it from the sides to the center. It will soon become creamy, then later will turn into a solid lump. Working a small portion at a time between the palms of your hands will turn it pliable, smooth and satiny.

Let the prepared fondant rest in an airtight glass container for 24 hours.

Make the bonbons

Mince the candied ginger more or less finely–according to taste. Take about half of the prepared fondant and work it with your hands, mixing in the minced ginger. Then take small lumps, no larger than a hazelnut, and roll them between the palms of your hands. Place each tiny ball on a lightly greased tray, and let stand a few minutes.

Place the remaining fondant in a double-boiler and melt it over very low heat. Add a tsp water at a time until it reaches the consistency of thin cream. Dip each bonbon in the melted fondant (the fondant must not be hot) then place it on a lightly greased tray. Decorate the top of each bonbon with a tiny piece of candied ginger.

Note: the bonbons can also be dipped in melted chocolate.

Posted in American Cooking, Blog Events, Candy & Confections, Spices, Sweetmeats | Tagged: , , , , | 4 Comments »

Kuchen Roll (bbd #05)

Posted by bakinghistory on January 1, 2008

kuchen-roll-1.jpg

A slightly sweet yeasted dough with a touch of nutmeg and a flavorful prune-cinnamon filling

breadbakingday51_2_2.jpg This is my entry for bread baking day #05, hosted this time by Chelsea at Rolling in Dough, and initiated by Zorra. Chelsea proposed Filled Breads as a theme, and I decided to keep on the sweet side with this kuchen roll. The dough is actually barely sweet, which lets the prune-cinnamon filling really shine through. It is perfect with a glass of lemon tea.

bbd #05 roundup is here 

From the original recipes by Lizzie Black Kander (Mrs. Simon Kander)

In “The Settlement Cook Book”, 1901–USA

Kuchen Dough, No. 1

1 pint (470 ml) milk, scalded

1/2 cup (113g ) butter

1/2 cup (100) sugar

1 tsp (6 g) salt

5-1/2 to 6 cups (750 g-820 g) bread flour (or as needed)

yolks of 2 eggs (or 1 egg)

1-1/2 tsp (6 g) active dry yeast

grated nutmeg to taste

1 egg to shine the roll surface

Prune Filling

1 lb. (454 g) prunes

2 qt. (1.90 l) water

1 cup (200g) sugar

2 tbsp (30 ml) lemon juice

grated lemon zest

1 stick cinnamon (or 1 tsp of ground cinnamon)

Make the Filling

Soak the prunes in water for a few hours, then cook them in the same water, with (a stick of) cinnamon, until soft. Add sugar (1/4 cup of sugar every 2 cups of stewed prunes) and cook 2 minutes more. Take off the heat, add lemon juice to taste and lemon zest. Remove cinnamon stick (unless you used ground cinnamon) and process the prunes in a food processor or with an immersion blender till creamy. The quantity of sugar and lemon juice should be adjusted by taste; personally I prefer the filling to be rather tart.

Place the prepared filling in a covered glass container and refrigerate for at least 30 minutes. It can be prepared the day before.

Make the Kuchen Dough

Dissolve the yeast with 1 tsp of sugar in 1/2 cup of the warm milk and set aside till foamy. To the rest of the milk add the butter, sugar, salt, nutmeg and, when cool, the two beaten yolks or the beaten egg. Add some of the flour, mix well, add the yeast-milk mixture and then the rest of the flour, kneading on low speed with the dough hook attachment if using a stand mixer. The dough should be well developed, smooth, soft, supple and satiny; the amount of flour has to be adjusted so that the dough is not sticky but still fairly soft. Let the dough rise, in a covered container, until doubled and light. Then take the dough, press it flat with the palms of your hands in a rectangular shape, not too thin or it might tear, spread with prune filling leaving a little clean margin on one of the short sides. Roll up the dough, starting with one of the short sides and seal well the seams.

Let the shaped roll(s) raise, covered, till light. Gently brush the surface with the beaten egg glaze and bake in a preheated oven at 350°F (180°C) for about 35-40 minutes.

Cool the rolls on racks (unmold them if you used a pan). Slice and serve only when they are throughly cold.

The roll can be baked free form on a baking sheet lightly greased and floured, or arranged in a lightly greased bundt pan.

The dough can also be divided in two before rolling and filling to make two smaller rolls to bake free form or to arrange in a pan.

Posted in Blog Events, Fruit, Jewish Cooking, Spices, Yeasted Breads, Yeasted Cakes, Kuchen, Coffee Cakes | Tagged: , , , , , | 14 Comments »