Baking History

A Taste For The Past

Archive for the ‘Yeasted Breads’ Category

Boston Brown Bread (Yeasted) World Bread Day 2009

Posted by bakinghistory on October 16, 2009

boston-brown-bread-1

Boston Brown Bread dates back to Colonial times and is traditionally paired with Boston Baked Beans

world bread day 2009 - yes we bake.(last day of sumbission october 17) Today is World Bread Day and as always I am happy to participate in this event hosted by Zorra.

I write from Massachusetts, so I chose an old-fashioned recipe for a classic New England bread, made since Colonial times. It contains equal quantities of rye, corn, and whole wheat flour, plus molasses and yeast, and it is steamed rather than baked. The result is a moist loaf, with a complex flavor and a mild sweetness. Great for dinner on a cool Autumn evening—along with a steaming bowl of baked beans or soup.

From the original recipe by Paul Richards

In: Baker’s Bread, 1918—USA

Ingredients

100 g rye flour

100 g whole wheat flour

100 g cornmeal

100 g Graham flour

5 g active dry yeast

8 g Kosher salt

135 g molasses (not blackstrap)

100 g boiling water

100 g warm water

milk as needed

Mix the rye flour and yeast with lukewarm water and set aside to ferment until light.

Scald the cornmeal with boiling water and set aside until cool.  Add molasses and salt, then remaining flours and rye sponge. Add drops of milk if dough is too stiff.

Place mixture in a well greased glass or stainless steel steamed pudding mold, which mixture should fill by 2/3. Cover tightly. Place mold in large pot of boiling water (having first placed a rack on the bottom) and steam, covered for 2 hours, keeping the water always boiling and reaching 2/3 up the mold. Add additional boiling water as needed.

Unmold and serve immediately.

Posted in American Cooking, Blog Events, Regional American Food, Rye, State Foods, whole grains, Yeasted Breads | Tagged: , , , , , , | Leave a Comment »

Green Pea Flour Bread (bbd #14)

Posted by bakinghistory on November 30, 2008

pea-bread-2

Pea flour gives the crumb of this bread a delicate green tinge

ROUNDUP IS HERE

breadbakingday #14 - colored breads

This is my entry for bbd#14—a monthly event initiated by Zorra—hosted this time by Boaz at Grain Power whose theme is Colored Breads. I actually did not expect the final color of this bread would be this intensely green, and it was a pleasant surprise that even if baking had turned the crust a nice golden shade the crumb had still retained the green tones of the raw pea flour I used. The recipe is based on one published in 1919 which suggested several possibilities from pea to garbanzo to peanut flour. The bread tastes good, slightly reminiscent of the aroma of pea soup—not that surprising, actually—and even if unusual it is definitely pleasant. The texture of the crumb is soft and tight, so this bread works well for sandwiches or toasted to make croutons to serve with soups.

It is important to rely on how the dough “feels” to determine the right amount of water to use, since the rate at which the pea flour absorbs water can vary. You want a rather slack dough to avoid ending with a heavy and dry loaf. I found what to me seems the best way to make sure that the dough has the right amount of hydration, by adapting a method to treat garbanzo flour as it is used in the Italian region of Liguria to make farinata. The pea flour was mixed with water and let to rest overnight before adding it to the bread dough, and this made all the difference.

From the original recipe by: United States Dept. of Agriculture

In: “Farmers’ Bulletin”, 1919—USA

Ingredients

1 cup milk (or as needed), scalded and set aside until lukewarm

1-1/2 tsp salt

2 tbsp maple

1 cup pea flour (160g) + 1/2 cup water (Green pea flour is made by Bob’s Red Mill)

3 cups bread flour (375g ) (King Arthur)

1/2 tbsp yeast dissolved in 1 tbsp warm water

1 egg white mixed with 1 tbsp water to glaze

Mix the pea flour and 1/2 cup of water and let stand, covered, overnight. Then eliminate any foam that might have formed while the pea flour was soaking, and place the mixture in the bow of an electric mixer. Add the yeast dissolved in 1 tbsp water, the maple syrup and cooled milk and 1 cup of bread flour. Mix well at low speed and set aside, covered, until doubled in bulk. Add remaining flour, salt and enough extra milk or water to have a slack but well developed dough, mixing at slow speed until the dough holds together and is smooth and supple. Let rest and ferment, covered, until doubled in bulk, then shape into a loaf and let it ferment again until light. Brush with the egg white mixture and slash, then bake in a preheated 400F oven for about 50 minutes. Cool on a rack.

Posted in American Cooking, Blog Events, Yeasted Breads | Tagged: , , | 8 Comments »

Orange Bread

Posted by bakinghistory on October 22, 2008

A very good bread with a citrusy aroma

This recipe results in a wonderful loaf full of the flavor and scent of oranges, thanks to both freshly squeezed orange juice and a good amount of orange zest. The texture is reminiscent of a very light brioche, or even challah, with a moist fine crumb and a thin, soft crust. It is excellent freshly baked, and, later, toasted and spread with sweet butter and a good orange marmalade, to have with tea or coffee.

This bread goes to Susan’s Yeast Spotting Roundup is HERE

From the original recipe by the King’s Daughters Society of Duluth, Minnesota

In: King’s Daughters Cook Book, 1916—USA

Ingredients:

4 cups bread flour

1-1/4 tsp active dry yeast

1/4 cup of warm water

1 cup to 1-1/4 cups orange juice (about 2 large organic oranges, or 3 small ones)

grated zest of all the oranges used for the juice

1 tsp salt

2 tbsp sugar

1 large egg yolk

2 tbsp butter, softened

1 large egg white (to glaze)

Mix the yeast in the warm water and set aside for about 10 minutes.

In a mixer bowl pour 1 cup of orange juice, the grated zest, egg yolk, sugar and flour, mixing on low speed for about 1-2 minutes. Add the yeast and mix for a few more minutes, then add the salt. Mix a little longer, at low speed, and then add the butter. Mix until the butter is well incorporated and the dough is smooth and well developed. You might need extra orange juice, depending on how your flour absorbs liquids. I needed 1/4 cup extra juice, and I used King Arthur bread flour.

It is important to have some extra juice on hand if needed, because adding extra water would diminish the bread’s orange flavor.

Let the dough ferment in a lightly greased covered bowl, until double in bulk. Then shape it as you like (I made a large 4-strand braid), but it can also be baked in two bread pans (9 x 5-inch pans).

If you decide to bake it free-form, sprinkle generously a baker’s peel or a baking sheet with semolina, then place the loaf on it.

Let the prepared loaf (or loaves) ferment, covered, until light, then brush gently with the egg white lightly beaten with 1 tbsp water.

Bake in a preheated oven (350°F) on a baker’s stone if you have one, or simply on the baking sheet on which the bread proofed, for about 45 minutes or 1 hour, depending on the size, until the crust is a deep golden brown. Cool the bread(s) on a rack.


Posted in American Cooking, Fruit, Yeasted Breads | Tagged: , , , , | 15 Comments »

Squash Bread (World Bread Day ’08)

Posted by bakinghistory on October 16, 2008

A wonderful loaf with a moist, chewy crumb and a crispy crust

3rd World Bread Day hosted by 1x umruehren bitte aka kochtopf

For this 2008 edition of World Bread Day, a blogging event founded and hosted by Zorra, I wanted to bake a bread with an ingredient with ties to the region of the United States where I live: New England.

So I chose to bake a bread made with  buttercup squash. The word squash originates from the Massachusett Indian word askutasquash, which indicated a vegetable that was eaten raw.

This bread is one of the best I have ever baked, and definitely one of my family’s favorites in the Fall. The squash provides a very moist and holey crumb, and the most gorgeous golden-orange color. The crust bakes crisp and the bread tastes only slightly sweet. It is great with a hearty soup for dinner on a cool Autumn evening.

The recipe comes from Mary Johnson Lincoln, a Massachusetts native who was a teacher at the famed Boston Cooking School and whose students included Fannie Farmer.

I recommend using buttercup squash because of its superior flavor and texture.

From the original recipe by: Mary J. Lincoln

In: “Mrs. Lincoln Boston Cook Book”, 1916—USA

Ingredients:

1 cup (250 g) baked and pureed  buttercup squash

2 tbsp (25 g) sugar

1-1/2 cups (366 g) whole milk

1 tbsp (15 g) butter

1/2 tsp (2 g) active dry yeast dissolved in 1 tbsp (15 ml) warm water

1 tsp (6 g) salt

3-1/3 cups to 4-1/3 cups (455 g to 595g) bread flour (as needed) I use King Arthur bread flour

semolina or cornmeal for the baking sheet

Scald the milk, then mix in it the pureed squash, butter, salt, and sugar.  When this mixture is cool add the yeast (mixed with the lukewarm water) and enough flour to have a dough that is well developed and supple, but rather slack. Knead well.

The dough should be soft and feel slightly tacky. Let it ferment, in a slightly greased bowl, covered, until double in bulk. Then gently shape it into a loaf on a floured surface, and place it on a baker peel or baking sheet on which  you have sprinkled a layer of fine semolina or cornmeal. Let the bread rise, covered, until light.

Preheat the oven to 450°F (232°C).

Bake the bread directly onto a baking stone if you have one or on the baking sheet for about 40-45 minutes, until golden brown. Add steam for the first 10 minutes, by placing in the oven a small metal pan filled with boiling water. Lower the temperature to 425°F (218°C) after the first 15 minutes.

This is how the crumb will look: (click on picture)

Thank you Zorra for hosting again World Bread Day!!!


Posted in American Cooking, Blog Events, Regional American Food, Yeasted Breads | Tagged: , , , , , , | 21 Comments »

Prune and Walnut Whole-Wheat Loaf

Posted by bakinghistory on September 8, 2008

A sweet whole wheat bread full of prunes and walnuts

This is my entry for this month edition of Weekend Breakfast Blogging, a blog event started by Nandita of Saffron Trail and hosted this time by Aparna of My Diverse Kitchen. The theme proposed by Aparna is “Grains in my Breakfast”.

HERE IS THE ROUNDUP

This simple whole-wheat bread is one of my favorites to have for breakfast, usually lightly spread with very fresh cream cheese and paired with a cup of strong black tea.

The liquid for this dough is provided by the water in which prunes are briefly simmered to soften, which provide flavor and just the right sweetness, counterbalanced by the slightly bitter aftertaste of the walnuts and the full  flavor of whole wheat.

Other dried fruits can be used instead of prunes, and in my opinion dried tart cherries work amazingly well—however, my favorite remains the one made with prunes, as in the original recipe.

This bread also goes to Susan’s Yeast Spotting

From the original recipe by Carolyn Putnam Webber

In: “Two Hundred and Seventy-five War-time Recipes, 1918—USA

Ingredients

1/2 cup dried prunes (I used unsulfured, organic prunes)

1 cup water

1/4 cup (organic) sugar

1 tsp salt

1 tbsp butter

1/2 cup walnut pieces

2-1/4 cups whole wheat flour (or as needed)

1-1/4 tsp active dry yeast dissolved in 1 tbsp warm water.

Briefly simmer the prunes in 1 cup of water, just until tender—they should not be mushy. Strain the prunes and reserve the cooking liquid (add extra water to make 1 cup). Cut the prunes in quarters, then set aside.

Add the sugar and salt to the cooking liquid, mix well and set aside until lukewarm

Place 2 cups of the flour in the bowl of a stand mixer, add the yeast and then the cooled cooking liquid. Mix on low speed until a dough forms, and towards the end add the butter cut in small pieces. The dough should be well developed and supple, but not too stiff. Add the remaining flour as necessary.

Let the dough ferment, covered, until doubled in bulk. Knead briefly again, let ferment once more in a covered bowl until doubled in bulk. Gently flatten and stretch the fermented dough to form a rectangle, then spread the walnut and prune pieces, pressing them into the dough. Roll up like a jelly-roll, pushing to avoid trapping air inside. Form into a loaf and place into a lightly greased  8 x 4-inches bread pan and let it ferment covered until the dough reaches about 1/2-inch above the rim of the pan.

Bake in a preheated oven (350F) for about 35 minutes, until golden brown. Unmold the bread and let it cool on a rack before slicing.

Posted in American Cooking, Blog Events, Eggless, Fruit, Tea, Treenuts, whole grains, Yeasted Breads | Tagged: , , , , , , , | 12 Comments »

Barley Bread (bbd # 13)

Posted by bakinghistory on August 28, 2008

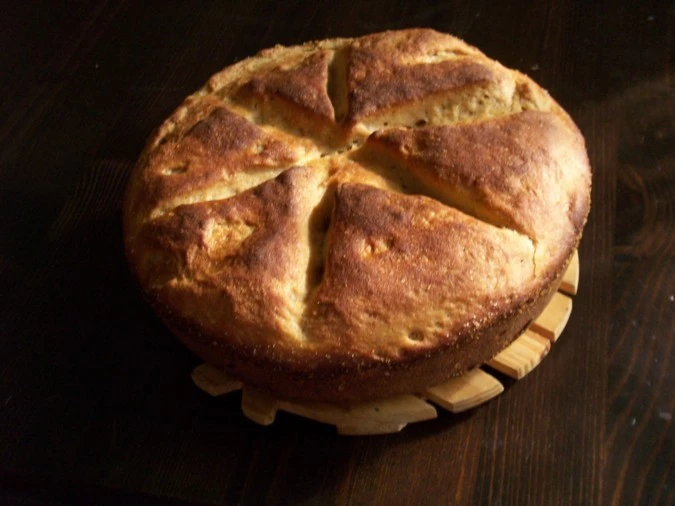
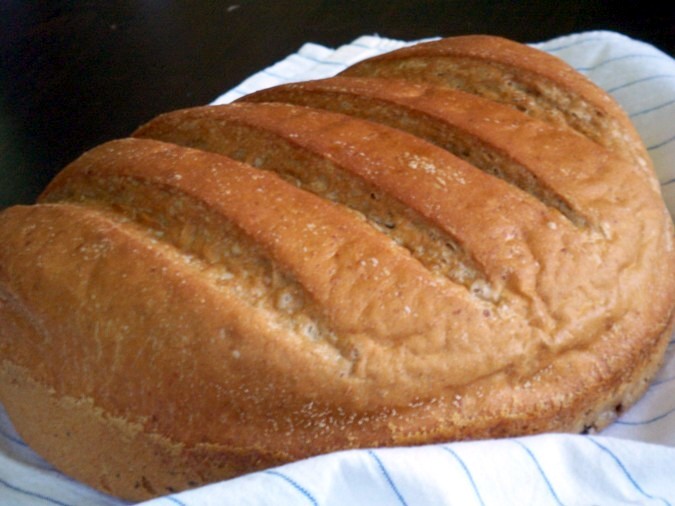
A tasty bread made with barley flour and a touch of maple syrup

bbd #13  ROUNDUP HERE

Jude of Apple Pie, Patis, and Pâté is the host of bread baking day#13 (a monthly bread baking event initiated by Zorra) and proposed whole grains as a theme.  Among the many recipes I had bookmarked I finally chose this one because it is made with a good amount of stone ground barley flour.  Barley bread has a very long history—it is for instance often cited in the Bible. In the Book of Judges Gideon hears of a man’s dream in which a cake of barley bread went rolling down from the hill where Gideon’s army was stationed, and tumbling into the host of Midian.

Barley was grown and used for bread in many places and cultures since ancient times, including Greece and Rome, Egypt, Scandinavia, the British Isles, Mesopotamia, and East Asia. Bread made with it was usually coarse and dark and as a consequence not very appreciated,  although more affordable than bread made with wheat.

This recipe calls for 50% barley and whole-wheat, and it also contains mashed potatoes and a small amount of butter and maple syrup. The result is a hearty but very tender loaf, with a  thin, crispy crust and a moist crumb. The flavor of barley shines through and the subtle sweetness of maple can be detected as well.

It is perfect to accompany a thick vegetable soup, with sharp cheeses, or just simple and unadorned, to enjoy its hearty flavor.

This bread also goes to Susan’s Yeast Spotting

From the original recipe by Amelia Doddridge

In: “Liberty Recipes”, 1918—USA

Ingredients

3/4 cup (160 g) mashed potatoes (about 2 medium potatoes (Yukon Gold)

1 tbsp (15 ml) pure maple syrup (Grade B)

1/2 cup whole milk

1 tsp (5 g) unsalted butter

1 cup (120 g) whole-grain, stone-ground barley flour (Bob’s Red Mill)

1-1/4 cup (150 g) white whole-wheat flour (King Arthur’s)

1 tsp (5 g)  fine sea salt

1-1/4 tsp (5 g) active dry yeast dissolved in 2 tbsp (30 ml) warm water

fine semolina for the pan

Peel the potatoes, rinse them well and dice them. Boil the potato pieces in the milk until tender, then drain them reserving the milk. Mash the potatoes through a  ricer than mix in the salt, maple syrup, and butter. Add 1/2 cup of the hot reserved milk (add water to make up the measure if necessary) and set aside to cool.

Once the potato mixture is lukewarm add the yeast dissolved in 2 tbsp of warm water.

Let the mixture cool completely. Then add the flours (sifted together) and knead on low speed until the dough is well developed and just barely tacky. If the potatoes are kneaded with the flours while still warm they will turn gooey and require extra flour which will make the final result heavy.

Let the dough ferment in a covered and lightly greased bowl until doubled, then knead again briefly and let ferment again until doubled.

Preheat the oven to 375°F (190°C)

Prepare an 8 x 4-inches bread pan or a small cast iron Dutch oven: lightly grease bottom and sides of the pan and sprinkle generously with fine semolina. Once the dough is ready knead it again then place it in the prepared pan or pot. Cover and let ferment until light then sprinkle with about 2 tbsp of water and score the surface.

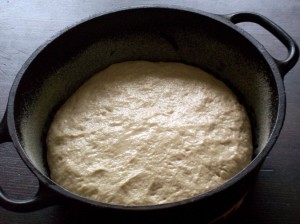
Place it in the oven and bake, covered, for 25 minutes, then lower the temperature to 350°F (180°C), uncover and finish baking until golden, about 25 minutes more.

Carefully lift the loaf out of the pan or pot with a thin metal spatula (if enough semolina was used this should be easy) and let it cool on a rack.

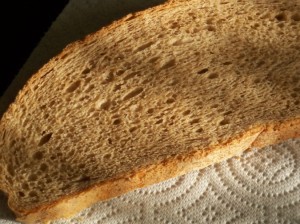
This is how the crumb should look:
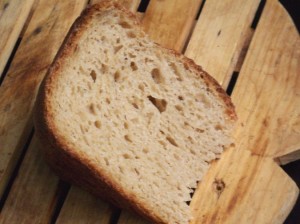
Posted in American Cooking, Blog Events, Cast-iron cooking, Eggless, whole grains, Yeasted Breads | Tagged: , , , , , , , , , | 15 Comments »

Bean Bread

Posted by bakinghistory on August 23, 2008

A pleasant bread with a thin, crispy crust and a tender, moist crumb

This is my entry for My Legume Love Affair-Second Helping hosted  by Susan from The Well-Seasoned Cook

ROUNDUP IS HERE

and for

Yeast Spotting hosted by Susan of Wild Yeast.

In the vintage cookbooks that I have read I have found that beans are used in bread in two forms: cooked and mashed or as flour. The addition of either was done at times for health reasons (improving the bread nutritional value) and at times for economy.

I recreated the recipe for this bread from one suggested by Eliza Acton in her influential “The English Bread-book: for domestic use”.  Miss Acton’s instructions were brief and I added a few details myself.  The recipe required “French-beans” which here are usually called navy beans.

I included a little butter and used 50% bread flour and 50% whole wheat flour, to approximate wheatmeal, which was originally called for in the recipe. I did not add any sweetener, but a little brown sugar or honey might be added to taste. I baked the bread in a covered cast iron Dutch oven.

The bread develops a thin, very crispy crust and a fine, moist crumb. The beans do not add much in terms of flavor but provide the moisture for the velvety crumb.

From the original recipe by Eliza Acton

In: “The English Bread-book: For domestic use”, 1857—UK

Ingredients:

For the overnight sponge:

1/8 tsp active dry yeast

250 g (2 cups) white whole wheat flour

150 g warm water

For the dough

1/2 lb cooked navy beans, pureed

250 g (1-3/4 cups) bread flour

2 tbsp brown sugar or honey (optional)

2 tbsp unsalted butter, cold and thinly sliced

9 g fine sea salt

1 tsp active dry yeast

130 g warm water—or as needed

Make the sponge: stir the yeast in the warm water then add the flour and knead briefly until smooth. Shape into a ball place it in a covered glass container and let the sponge ferment overnight in a cool place (12-14 hours).

Make the dough: stir the yeast in half the amount of water, (the sugar or honey if you want) then mix in the pureed beans and finally the sponge cut into small pieces. Mix at low speed for a minute or two, then add the flour and salt and enough of the remaining water to have a dough that is soft and supple. More water or flour might be necessary. Knead at low speed until the gluten is well developed (about 10-15 minutes), and towards the end add the butter, kneading until well incorporated.

Let the dough ferment until doubled in bulk, in a covered bowl. Briefly knead again and let the dough ferment once more until doubled.

Shape the bread and place it in a large cast iron Dutch oven (or clay pot) that you have previously lightly greased and sprinkled with semolina). Preheat the oven to 350F (180C) and once the bread is light score it, sprinkle with water and place the pot (covered) in the oven. Bake for 30 minutes then uncover the pot (carefully!) and let the bread finish baking until golden brown.

Carefully take the pot out of the oven and lift the loaf out —it should be easy, especially if you used a cast iron pot, the bread won’t stick.

Let the bread cool completely on a rack before slicing.

Posted in Beans, Blog Events, Cast-iron cooking, whole grains, Yeasted Breads | Tagged: , , , , | 7 Comments »

Corn Flour Rolls (bbd #12: Small Breads)

Posted by bakinghistory on August 1, 2008

Soft dinner rolls made with corn flour and flavored with lemon zest

Roundup part 1Roundup part 2

breadbakingday #12 Bread Baking Day is a monthly blog event initiated by Zorra and hosted this time by Aparna of My Diverse Kitchen.This month’s theme is “small breads”.

These corn flour rolls are soft and light, slightly sweet and wonderfully flavored by a good amount of lemon zest and a touch of butter which combine perfectly with the taste of corn.  Corn flour is finer than cornmeal and provides a nice chewiness without making the texture gritty.

The recipe comes from an American collection of recipes published in 1918 and meant to provide people with ways to conserve precious resources such as wheat flour and sugar. Despite the economy of ingredients these rolls truly taste rich and wholesome, and are well worth trying.

From the original recipe by Amelia Doddridge

In: “Liberty Recipes”, 1918—USA

Ingredients

1/2 cup scalded  milk

1 egg, well beaten

2 tbsp sugar

2 tbsp melted butter

1/4 tsp fine sea salt

zest of 1 (organic) lemon

1/2 cup (60 g)  corn flour (I used Bob’s Red Mill brand)

1 tsp active dry yeast dissolved in 2 tbsp warm water

3/4 cup to 1-1/2  (105g to 210 g) cups bread flour (or as needed) (I used King Arthur bread flour)

Pour the scalded milk over the sugar and salt, mix well and set aside to cool. Once the milk mixture is lukewarm add 3/4 cup of bread flour and the dissolved yeast. Mix vigorously and let the sponge ferment,covered, until doubled.

When the sponge is light add the melted butter, egg, grated lemon rind and corn flour. Mix well at low speed then add just enough bread flour to make a dough that is very soft but well developed and just slightly tacky.  Do not add too much flour or the rolls will turn out dry and heavy.

Lightly grease a bowl and place the dough to rise, covered, until doubled in bulk.

Preheat the oven to 375°F.

Gently transfer the risen dough onto a lightly greased surface and divide it in 12 equal pieces. Shape each into small round rolls (the dough is too soft to keep well any other shape more complex than rounds or ovals). Place each roll onto a rimless baking sheet and lightly brush with milk.

Let the rolls rise, covered, until doubled. Brush again with milk then with sharp kitchen scissors cut a decorative pattern on each roll.

Bake for about 20 minutes until nice and golden.

These rolls are great to eat either warm or cold. They can also be split and toasted to have with jam or marmalade, and can be frozen once cooled.

Posted in American Cooking, Blog Events, Grains, Rolls, Yeasted Breads | Tagged: , , , , | 13 Comments »

Graham Bread

Posted by bakinghistory on July 5, 2008

Made with Graham flour, this bread has fiber and a wonderful taste and texture

Graham flour was created by Sylvester Graham, who preached the importance of a wholesome, healthy diet at a time when flour and baked goods were usually tainted by additives.

Today is actually Reverend Graham’s birthday: my friend Louise from Months of Edible Celebrations and I are marking this together. Head over to her wonderful blog to read about the interesting life and times of Sylvester Graham.

Most recipes in the old cookbooks call for molasses among the ingredients for this bread, but I used one that called for sugar instead, and the final result is a wonderful bread—slightly sweet, moist, with a nice soft crust and crumb, and the nutty flavor of whole grain. It also stays fresh a long time, and makes some of the best PB&J sandwiches.

From the original recipe by Maria Parloa

In: “Miss Parloa’s New Cookbook: A Guide to Marketing and Cooking”, 1882—USA

Ingredients

2 cups water or milk, warm (I used one cup of each)

2 cups of bread four (I used King Arthur brand)

2 generous cups Graham flour (I used Bob’s Red Mill brand)

1/2 cup sugar (I used organic granulated sugar)

1 tsp salt

1/4 tsp dry active yeast

If using milk, scald it then set aside to cool to lukewarm. Dissolve the yeast in the warm water, milk, or a mixture of both, and set aside for about 5 minutes.

Mix in the bread flour (the mixture will be soupy), and set aside, covered, to ferment overnight in a cool place (about 60°F).

In the morning add the Graham flour, salt and sugar and beat at medium high speed until gluten forms. The dough is very soft, and cannot be kneaded by hand, unless you use a dough scraper.

Depending on the weather and other factors, more or less Graham flour will be necessary. This time it took almost 2-1/2 cups to have a rather slack dough. It is important to beat it in the mixer with a paddle attachment long enough to develop the gluten (about 10 minutes). Adding too much flour will make the bread heavy and crumbly.

Line with heavy duty aluminum foil one 9.1 x 5.4 inch (13.6 x 23.2 cm) loaf pan and grease very generously.

This bread has a tendency to stick firmly to the pan, and using the aluminum foil will make unmolding the bread so much easier.

As soon as the dough is ready and starts to clean the sides of the mixer bowl pour it into the prepared pan and let rise, covered, until it reaches about 1 inch above the pan sides. Spray with water and bake in a preheated oven at 400°F (200°C) for 15 minutes, then lower the temperature to 350°F (180°C) and bake an additional 20-25 minutes.

Take out of the pan and let the bread cool on  a rack. Do not cut the bread until perfectly cold. It can be kept wrapped in aluminum foil for 4-5 days.

See other great baked goods on Susan’s roundup of this week Yeast Spotting

Posted in American Cooking, Eggless, whole grains, Yeasted Breads | Tagged: , , , | 7 Comments »

Zwiebelplatz (Potato-rye flatbread with onions) bbd #07

Posted by bakinghistory on March 1, 2008

zwiebelplatz-3.jpg

An excellent rye flatbread with a chewy crumb speckled with potato bits and topped with sweet onions

Roundup is HERE 

— 


breadbakingday 7 This is my entry for bbd #7 hosted this time by Cascabel of Chili und Ciabatta and initiated by Zorra. Cascabel proposed a great theme: flatbreads.

This rye flatbread—made with dark rye flour, potatoes, cornmeal, and a generous topping of onions—is amazingly good. The potatoes and rye provide a moist, chewy interior, speckled with potato bits. The roasted onion topping adds layers of flavor and sweetness. One of the best breads I have ever made.

From the original recipe by Florence Kreisler Greenbaum

In: The International Jewish Cook Book: 1600 Recipes According To The Jewish Dietary Laws With The Rules For Kashering: The Favorite Recipes Of America, Austria, Germany, Russia, …”,1919—USA

Ingredients

2 cups (275 g) (Yukon Gold) potatoes, peeled and diced

2 tbsp (18 g) kosher salt

2 tbsp (15 g) yellow cornmeal (whole grain, stone ground)

1 cup (102 g) dark rye flour

3 cups (400 g) bread flour (King Arthur brand) or as needed

1/2 tbsp (6 g) sugar

1 tsp (4 g) active dry yeast dissolved in 2 tbsp (30 ml) warm water

2 tbsp (30 g) unsalted butter

Topping

1 onion, sliced paper-thin

1-2 tbsp (15-30 g) butter

Cook the potatoes in boiling water until tender. Strain and reserve cooking water. Mash the potatoes and place them in the bowl of a stand mixer. Measure 1-1/2 cups of the potato water (add extra water if necessary to have 1-1/2 cups) place in a saucepan and mix with the salt and cornmeal. Bring to a boil, then take off the heat and add the butter, stirring until it is melted. Pour the mixture on the mashed potatoes and mix briefly. Let cool.

Once the potato mixture is cold, add the flours and then the yeast dissolved in 2 tbsp (30 ml) warm water. Knead until the dough develops, about 7 minutes at low speed. The dough will be tacky, if too sticky and wet you may need to add a little more bread flour. Don’t add too much, the dough should be tacky because of the rye and potatoes.

Place the dough in a buttered bowl, cover and let it rise—preferably overnight in a cool place. The refrigerator might be fine, but a room with a temperature of 50°F (10°C ), such as a basement, is best.

Preheat the oven to 450°F (230°C), place a rack in the middle slot.

Once the dough is fermented, take it out of the bowl and delicately, without kneading it, stretch it and flatten it with the palms of your hands to form a thin rectangle. Place it in a buttered jellyroll pan (11 x 16 x 0.5-inch—28 x 40.5 x 1.27 cm), spread on the surface the onion slices and dot with butter here and there. zwiebelplatz-1.jpg (click on picture to enlarge).

Immediately bake the bread for about 20-25 minutes. zwiebelplatz-2.jpg (click on picture to enlarge)

Notes: it is important that the potatoes are mashed while still hot and mixed with the flours when cold. Warm potatoes make the dough gooey and tend to absorb lots of flour, ruining the final result.

Mashing the potatoes with a fork so that small pieces remain whole is better than using a potato ricer—the potato bits are tasty to find in the finished bread.

Posted in American Cooking, Blog Events, Jewish Cooking, Rye, Yeasted Breads | 16 Comments »